Ubuntu 22.04にGrowi 6.xをインストール
GrowiをUbuntu22.04をインストールしたので、そのときの手順です。
※ Growi v7以降、いくつか設定が異なりますので本稿ではv6での手順を示します。
環境
- Ubuntu 22.04
- Apache 2.4
の基本的な設定が済んだという状況です。
前提
- 名前解決できるドメインが用意されている。
- どのドメインに応じた証明書が用意されている。
さっくりとはならない手順
- Node.js/npmをインストールします。
- Redis-serverをインストールします。
- Javaをインストールします。
- ElasticSearch 8をインストールします。
- ElasticSearchの設定変更を行います。
- ElasticSearchのプラグインをインストールします。
- ElasticSearchの設定変更を反映します。
- MongoDBをインストールします。
- MongoDBのデータ格納先を変更します。
- MongoDBのアップデートを防ぎます。
- MongoDBの設定変更を反映します。
- yarnのインストールを行います。
- 必要パッケージをインストールします。
- turboパッケージをインストールします。
- Growiのインストールを行います。
- yarnを用いてインストールします。
- 自動起動のスクリプトを作成します。
- Apacheのリバースプロキシの設定を行います。
- ブラウザで起動します。
手順
node18をインストールします。
- レポジトリ追加
sudo curl -fsSL https://deb.nodesource.com/setup_18.x | sudo -E bash
- パッケージアップグレード
sudo aptitude update
- Node.jsインストール
sudo aptitude install nodejs
- Node.jsバージョン確認
node -v
2024/04/03現在:v18.20.0
- npmバージョン確認
npm -v
2024/04/03現在:10.5.0
redis-serverをインストールします。
- インストール
sudo aptitude install redis-server
- 起動確認
systemctl status redis-server
active(running)を確認します。
- 自動起動有効化
sudo systemctl enable redis-server
Javaをインストールします。
- インストール
sudo aptitude install openjdk-17-jdk
ElasticSearhをインストールします。
- gpg追加
sudo wget -qO - https://artifacts.elastic.co/GPG-KEY-elasticsearch | sudo gpg --dearmor -o /usr/share/keyrings/elasticsearch-keyring.gpg
- 必要パッケージインストール
sudo aptitude install apt-transport-https
- レポジトリ追加
sudo echo "deb [signed-by=/usr/share/keyrings/elasticsearch-keyring.gpg] https://artifacts.elastic.co/packages/8.x/apt stable main" | sudo tee /etc/apt/sources.list.d/elastic-8.x.list
- パッケージのアップグレード
sudo aptitude update
- ElasticSearchインストール
sudo aptitude install elasticsearch
※この後、デフォルトパスワードが表示されますが、控えておく程度にしましょう。
JVM設定変更
- バックアップディレクトリ作成
sudo mkdir /etc/elasticsearch/old
※任意のバックアップディレクトリを指定します。
- 設定ファイルバックアップ
sudo cp -pi /etc/elasticsearch/jvm.options /etc/elasticsearch/old/jvm.options.$(date +%Y%m%d)
- 設定ファイル書き換え
echo -e "-Xms256m\n-Xmx256m" | sudo tee -a /etc/elasticsearch/jvm.options
- 書き換え確認
sudo diff -u /etc/elasticsearch/old/jvm.options.$(date +%Y%m%d) /etc/elasticsearch/jvm.options
- 差分
+-Xms256m
+-Xmx256m
ElasticSearchの設定変更
※この作業だけ管理者権限で実行します。
- root昇格
sudo su -
- 設定ファイルバックアップ
cp -pi /etc/elasticsearch/elasticsearch.yml /path/to/backup/elasticsearch.yml.$(date +%Y%m%d)
任意のバックアップディレクトリを指定します。
- ファイル書き換え
sed -i -e 's/xpack.security.enabled: true/xpack.security.enabled: false/' \
       -e '/xpack.security.http.ssl:/{n; s/  enabled: true/  enabled: false/}' \
       -e '/xpack.security.transport.ssl:/{n; s/  enabled: true/  enabled: false/}' /etc/elasticsearch/elasticsearch.yml
- 差分確認
diff -u /path/to/backup/elasticsearch.yml.$(date +%Y%m%d) /etc/elasticsearch/elasticsearch.yml
- 差分
 # Enable security features
-xpack.security.enabled: true
+xpack.security.enabled: false

 xpack.security.enrollment.enabled: true

 # Enable encryption for HTTP API client connections, such as Kibana, Logstash, and Agents
 xpack.security.http.ssl:
-  enabled: true
+  enabled: false
   keystore.path: certs/http.p12

 # Enable encryption and mutual authentication between cluster nodes
 xpack.security.transport.ssl:
-  enabled: true
+  enabled: false
- rootから抜ける
exit
ElasticSearchのプラグインを追加
- analysis-kuromoji インストール
sudo /usr/share/elasticsearch/bin/elasticsearch-plugin install analysis-kuromoji
- analysis-isu インストール
sudo /usr/share/elasticsearch/bin/elasticsearch-plugin install analysis-icu
自動起動設定反映
- 起動
sudo systemctl start elasticsearch
- 起動確認
systemctl status elasticsearch
active(running)を確認します。
- 自動起動有効化
sudo systemctl enable elasticsearch
MongoDBインストール
レポジトリ追加
- 必要パッケージインストール
sudo aptitude install gnupg
- gpg追加
curl -fsSL https://pgp.mongodb.com/server-6.0.asc | sudo gpg -o /usr/share/keyrings/mongodb-server-6.0.gpg --dearmor
- レポジトリ追加
echo "deb [ arch=amd64,arm64 signed-by=/usr/share/keyrings/mongodb-server-6.0.gpg ] https://repo.mongodb.org/apt/ubuntu jammy/mongodb-org/6.0 multiverse" | sudo tee /etc/apt/sources.list.d/mongodb-org-6.0.list
MongoDBインストール
- パッケージのアップグレード
sudo aptitude update
- MongoDBインストール
sudo aptitude install mongodb-org mongodb-org-server mongodb-org-shell mongodb-org-mongos mongodb-org-tools
MongoDBバージョン固定
※2024/04/03現在、GrowiはMongoDBのバージョンが固定されているので、自動更新されないようにします。
sudo aptitude hold mongodb-org
sudo aptitude hold mongodb-org-server
sudo aptitude hold mongodb-org-shell
sudo aptitude hold mongodb-org-mongos
sudo aptitude hold mongodb-org-tools
保存先変更(オプション)
MongoDBの格納先を、冗長化構成されているパーティションにするため対応しました。
- 格納ディレクトリ作成
sudo mkdir /home/mongodb
保存先を変えたいところにします
- 所有者変更
sudo chown -R mongodb:mongodb /home/mongodb
- 所有者変更確認
ls -ld /home/mongodb
- 設定ファイルのバックアップ取得
sudo cp -pi /etc/mongod.conf /path/to/backup/mongod.conf.$(date +%Y%m%d)
任意のバックアップディレクトリを指定します。
- バックアップ確認
sudo diff -u /etc/mongod.conf /path/to/backup/mongod.conf.$(date +%Y%m%d)
バックアップが保存されたか、差分がないことで確認します。
- ファイル書き換え
sudo sed -i 's/dbPath: \/var\/lib\/mongodb/dbPath: \/home\/mongodb/' /etc/mongod.conf
- 差分確認
sudo diff -u /path/to/backup/mongod.conf.$(date +%Y%m%d) /etc/mongodb.conf
- 差分
-  dbPath: /var/lib/mongodb
+  dbPath: /home/mongodb
自動起動有効
- mongodサービス起動
sudo systemctl start mongod
- サービス起動確認
systemctl status mongod
active (running)を確認します
- 自動起動有効化
sudo systemctl enable mongod
yarnインストール
- npmでyarnインストール
sudo npm install -g yarn
- turboインストール
※Growi v6.1.0から必須パッケージとなりました。
sudo yarn global add turbo@1.12.2
※最新版のturboをインストールするとv6では動きませんでした。
Growiインストール
- git clone
sudo git clone https://github.com/weseek/growi /home/www-data/growi
※任意のディレクトリを指定します。
- ディレクトリ移動
cd /home/www-data/growi && pwd
先ほどcloneしたディレクトリです。
- チェックアウト
sudo git checkout -b v6.3.5 refs/tags/v6.3.5
2024/06/25現在、Growi6系最新版の6.3.5をインストールします
- yarnによるインストール
sudo yarn
CPUのスペックによっては相当な時間がかかります。
自動起動スクリプトの作成
- systemd作成
cat <<- __EOF__ | sudo tee -a /etc/systemd/system/growi.service
[Unit]
Description = growi
After=network-online.target mongod.service
ConditionPathExists=【/home/www-data/growi】

[Service]
ExecStart=【/home/www-data/growi/】growi-start.sh
Restart=no
Type=simple

[Install]
WantedBy=multi-user.target
__EOF__
※【】内を、git cloneしたディレクトリにします。
- Growiインストールディレクトリに作成
- 教義・信仰に沿ったエディタで作成します。
- ファイル名:
growi-start.sh- growiを配置したディレクトリ内に作成します。
#!/bin/bash
cd 【/home/www-data/growi】
NODE_ENV=production \
AUDIT_LOG_ENABLED=true \
FORCE_WIKI_MODE=private \
MONGO_URI=mongodb://localhost:27017/growi \
ELASTICSEARCH_URI=http://localhost:9200/growi \
REDIS_URI=redis://localhost:6379 \
PASSWORD_SEED=[任意の文字列] \
FILE_UPLOAD=local \
npm start
※【】内を、git cloneしたディレクトリにします。
[]内には任意の文字列を入れます。 例:PASSWORD_SEED=GOLDEN_SEED
また、オプションなどは好みに応じて指定してください。(FILE_UPLOAD=localは添付ファイルの保存先をDBではなくローカルに保存するオプションです)
- 権限変更
sudo chmod +x /home/www-data/growi/growi-start.sh
- systemd設定反映
sudo systemctl daemon-reload
- growi有効化
sudo systemctl start growi.service
- growi有効化確認
systemctl status growi.service
active(running)を確認
- 自動起動有効化
sudo systemctl enable growi.service
Apacheによるリバースプロキシの設定
- モジュールインストール
sudo a2enmod proxy_http rewrite header
- apache再起動
sudo systemctl restart apache2.service
- ログ保存ディレクトリ作成
suod mkdir /var/log/growi/
- 所有者変更
sudo chown -R www-data:www-data /var/log/growi
- 設定ファイル作成
cat <<- __EOF__ | sudo tee -a /etc/apache2/sites-available/growi.conf
<VirtualHost _default_:80>
    ServerName 【hoge.example.com】
    # ドメイン名を指定します
    RewriteEngine On
        RewriteCond %{HTTPS} off
        RewriteRule ^(.*)$ https://%{HTTP_HOST}%{REQUEST_URI} [R=301,L]
# HTTPアクセスを強制的にHTTPSにリダイレクトします
</VirtualHost>

<VirtualHost _default_:443>
    ServerName 【hoge.example.com】
    # ドメイン名を指定します
    CustomLog /var/log/growi/growi_access.log combined
    ErrorLog /var/log/growi/growi_error.log

#SSL設定
  SSLEngine on
    Protocols h2 http/1.1
  # SSLを有効化します

SSLCertificateFile 【/etc/certs/hoge.example.com.crt】
# SSL証明書を指定します
SSLCertificateKeyFile 【/etc/private/hoge.example.com.key】
# 秘密鍵を指定します

    # Header に Host: example.com を追加するため
    ProxyPreserveHost On
    # HTTPS利用時: Header に x-forwarded-proto: https を追加するため
    RequestHeader set x-forwarded-proto 'https'
    # Apache では static assets で 304 が返らないことがあるので ETag を無効化する
    <ifModule mod_headers.c>
            Header unset ETag
    </ifModule>
    FileETag None

    # socket.io の path を rewrite する
    RewriteEngine On
    RewriteCond %{REQUEST_URI}  ^/socket.io            [NC]
    RewriteCond %{QUERY_STRING} transport=websocket    [NC]
    RewriteRule /(.*) ws://localhost:3000/$1 [P,L]

    ProxyPass / http://localhost:3000/
    ProxyPassReverse / http://localhost:3000/

</VirtualHost>

SSLProtocol             all -SSLv3 -TLSv1 -TLSv1.1 -TLSv1.2
SSLCipherSuite          ECDHE-ECDSA-AES128-GCM-SHA256:ECDHE-RSA-AES128-GCM-SHA256:ECDHE-ECDSA-AES256-GCM-SHA384:EC6-GCM-SHA384
SSLHonorCipherOrder     off
SSLSessionTickets       off
__EOF__
【】内を自分の環境に変更してください。
※v7とはWebSocketの書き方が異なります。ご注意ください。
- 設定反映
sudo a2ensite growi.conf
- コンフィグ確認
sudo apache2ctl configtest
Syntax OKを確認します。
- Apache2再起動
sudo systemctl restart apache2.service
Growiインストール確認
http://設定したドメイン でアクセスします。
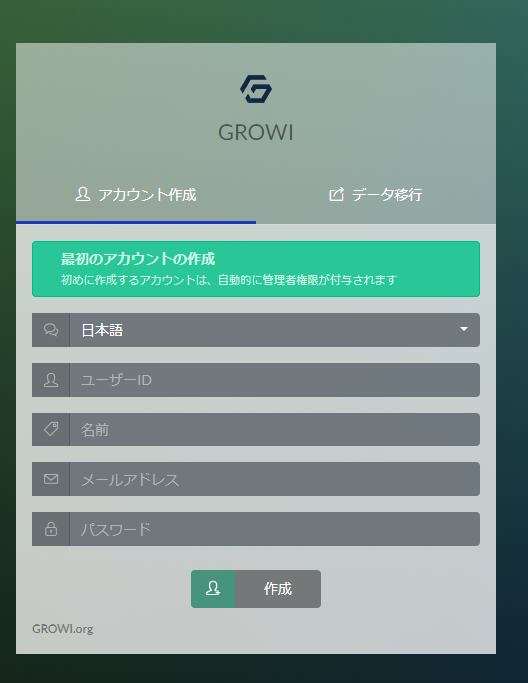
この初期サイトが表示されたらインストール完了です。